
Home
Lost Reg Code?
News
Online KiwiSDRs
macOS Software
Windows Software
Ham Radio iPhone/iPad
Linux Software
Support/FAQ
Update Policy
USB Icom CI-V Interface
Radio Hobbyist Products
22m Programmable Beacon Kit
CW Keyer For Beacons Kit
Jellyfish Transformer
Cyclops Antenna Transformer
General Interest Programs
Atomic Mac/PC
Audiocorder
Audio Toolbox
Black Cat Timer
Diet Sleuth
iUnit
Graffikon
Graph Paper Maker
Health Tracker
Image Resizer
Knitting Wizard
Label Wizard
Prog Audio Gen
Sound Byte
Synth 76477
Amateur Radio Programs
AirSpyHF+ Server
Audiocorder
Black Cat Absolute ACARS
Black Cat ACARS
Black Cat ALE
Black Cat ALE Vacuum Cleaner
Black Cat NetFinder
Black Cat GMDSS
Black Cat HF Fax
Black Cat SSTV
Black Cat NAVTEX SITOR-B
Carrier Sleuth
Cocoa 1090
Cocoa RTL Server
DGPS Decoding
DX Toolbox
Elmer
MatchMaker
KiwiKonnect
KiwiSDR Monitor
KiwiSDR Sound Client
MININEC Pro
Morse Mania
MultiMode
sdrRewind
RF Toolbox
SDRuno Plugin
SDRuno Equalizer Plugin
SelCall
Sonde
iPhone/iPad Apps
ALE
Atoms To Go
dB Calc
Clik Trak
DGPS Decoder
Drill Calc
DX Toolbox
Elmer Extra
Elmer General
Elmer Tech
Feld Hellschreiber
Field Strength Calc
Function Generator Pad
GMDSS
Godafoss
HF Weather Fax
iAttenuate
iFunctionGenerator
iSoundex
iSoundByte
iSweep
iUnit
Morse Mania
ACARS Pad
Morse Pad
NAVTEX Pad
Packet Pad
PSK31 Pad
SSTV Pad
Photon Calc
Rad Map Tracker
RF Link Calc
SelCall Tone Gen
Sound Byte
Sound Byte Control
Spectrum Pad
SWBC Schedules
Synth 76477
Synth Motion
Transmission Line Calc
Weather Calc
Wire Calc
iPhone/iPad Bundles
RF Calculator Apps
Ham Radio Decoder Apps
Audio Utility Apps
Shortwave Weather Apps
Ham Radio Exam Study Apps
Shortwave Decoder Apps
About Black Cat Systems
Site Map
Our software for Mac OSX
Privacy Policy
Press/Media
HFunderground
Apple /// Emulator
Macintosh Links
Shortwave Radio
Pirate Radio
Spy Numbers Stations
Science and Electronics
Ham Radio Software
Getting Started Using MultiMode Cocoa
The Basics - What You Need - Connecting Your Mac To Your Radio
MultiMode Cocoa is an app for macOS (Mac OS X) that lets you receive and send various amateur radio modes, such as CW (morse code), PSK31, SSTV, RTTY, FAX, and more. It runs on macOS versions from 10.6.8 right through Sierra 10.12. If you haven't already, you should download a copy.In order to receive (decode) the various digital modes, you need to feed sound from your radio into your Mac. In many cases, this can be done as easily as connecting a 1/8" audio cable from your radio's line level output to the sound input jack on your Mac. You can also use the headphone jack from your radio. In all cases, double check the output level from your radio first, to make sure the levels are not too high. You don't want to damage your Mac's sound input.
Unfortunately, Some Macs, including many recent models, don't have a sound input jack! Not to worry, you can use a USB sound device, like the Griffin iMic, or similar.
Next, run MultiMode. In the upper left corner of the window, you'll see various controls that deal with sound input:
The two popup menus in the lower left corner of that image are used to set the sound input source, as well as the sound output source. I have it set to use the iMac for sound input, and Built-In Output for the output, which mean's the Mac's speaker. We'll worry about changing that later, when dealing with sound output to your radio.
The vertical slider on the right side sets the input gain level, with many sound devices you can adjust this to vary the input level. The iMic doesn't allow that, so it is disabled and grayed out. To the left of that is the volume indicator. We want to see a green bar there, bouncing up and down, letting us know sound from the radio is getting to the Mac. If you don't see that, you should double check your connections, the input level, and the sound input source popup menu. Get that correct before proceeding further.
The PLAYTHRU button can be used to play the input sound through your Mac's speakers. That is a handy way to check that things are working, and can sometimes be useful if for example you use the headphone jack on your radio to get the sound, and it no longer play's through the radio's speaker.
Some newer radios have a USB port on them, and when plugged into your computer, they appear as a sound device. If your radio does this, then that is by far the easiest way to route sound back and forth. You just need to plug it in, run MultiMode, then select the radio as the sound input and output source from the popup menus in MultiMode.
Using MultiMode To Decode
When MultiMode starts up, it defaults to CW / Morse Code mode. You can select the mode you wish to use from the Mode menu. We'll use CW mode as our first example, since that is a common mode to decode.While you can tune in an actual CW QSO on your radio to learn how to use MultiMode in CW mode, you may find it is difficult to adjust settings as the stations change frequency, speed, etc, when you are first getting used to using the software. The best source of CW audio is from a W1AW CW broadcast. You can either tune in a live transmission, or go to their archive of recordings, and play one of these files into MultiMode: http://www.arrl.org/13-wpm-code-archive
If you want to use one of the recordings, you will need to get the audio into your Mac's sound input system. I find SoundFlower is a very handy tool for doing this. If you don't have SoundFlower, you can use an audio patch cable to route the Mac's headphone jack to your sound input jack (remember to watch the audio levels, to not damage anything!).
The W1AW operating schedule is here, if you want to tune in live: http://www.arrl.org/w1aw-operating-schedule One again, I strongly recommend listening the W1AW transmissions while you are learning how to use MultiMode in CW mode. Become proficient with that, before trying to decode some actual QSOs.
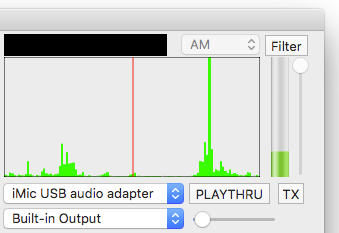
Here's a screenshot of the MultiMode window. We've manually set the speed to 13 WPM, although the AUTO button can also be used to tell MultiMode to automatically determine the speed. We know the speed is 13 WPM in this case, so it's best to manually set it, one less thing to go wrong. The center frequency is set to 750 Hz, that is the audio frequency of the CW tones. You will likely need to change this, depending on the frequency of audio from your radio in CW mode, or whatever audio source you are using. The Bandwidth setting controls how much filtering is applied to the audio signal. Smaller numbers mean more filtering, which can help under poor conditions, but too much filtering at high WPM rates will tend to smear things. You can click on the image to view it full size:

In the upper right corner, we see the tuning indicator. It shows an audio spectrum centered around the center frequency we have set, 750 Hz in this case, marked with a red vertical line. As you can see, there is a green spike aligned with that red line, showing we have correctly tuned in the station.
In the center left of the window, we see the demodulator output. That's the set of fuzzy black blocks. That shows how MultiMode has interpreted the audio, into morse code dots and dashes.
Below that is the decoded text, from the W1AW practice transmission.
Using MultiMode To Transmit
If you want to transmit, you have a few options. You need to get the audio output of your Mac into your radio. You can build a cable that takes the headphone output on your Mac, and runs it into the microphone jack or other input jack on your transceiver. You can also buy a RigBlaster or other such device which has all the necessary cabling. We have also heard good things about the SignaLink SL-1 plus from Tigertronics.You don't need a RigBlaster to use MultiMode, but it can make the connections much easier. As there are too many different radios out there, we can't give you specific information on how to connect to a particular model.
To control the PTT on your transceiver, you have two options. You can use a RigBlaster or SignaLink which can do this for you, it senses when there is audio coming out of the computer and switches PTT. Or you can use a serial port on your computer, and build an interface that switches PTT on your radio, using an opto-osolator, relay, etc. You would need to investigate how to do this on your particular radio. Some of the commercial interface units emulate a virtual serial port, and will handle the PTT switching that way.
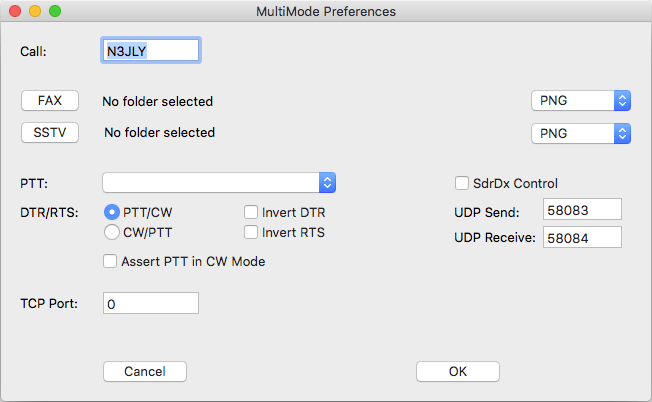
The only use for the serial port with MultiMode is to control PTT or CW keying line on the radio, it does nothing else. Modern Macs don't have serial ports, but you an use a USB to serial adapter. The DTR and/or RTS handshake output lines from the serial port can be controlled by MultiMode for this purpose.
To assign the serial port settings: Open the MultiMode Preferences, and there is a popup menu next to PTT, you select your serial port here. Then below that, you use the radio buttons to assign the use of the DTR and RTS handhake lines, which is for controlling PTT, and which controls CWkeying. You can also use checkboxes to invert the polarity of each output, if necessary. You can click on the image to view it full size:
Now, let's go back to the upper right corner of the MultiMode window:
Where the popup menu says Built-In Output, you will want to select your USB sound device if you are using one. If you are using the headphone jack for output, you can usually leave it alone. Just to the right of the output source popup menu, under the PLAYTHRU button, is a slider used to set the output volume. You can adjust this to get the right volume level for audio that you feed to your radio, so as to not overdrive.
The TX button puts MultiMode into transmit mode. Let's do a simple test, you don't even need your Mac connected to your radio. Select Built-In Output as the output source. Press the TX button to put MultiMode in transmit mode (make sure MultiMode is in CW mode). Now go to the very bottom of the MultiMode window, and type in some text. After a short delay, the text will start to disappear from that field, and appear above it, and you will hear the morse code characters being sent.
If you now feed this audio into your radio, and transmit in SSB mode, you can transmit morse code. You could also use a USB/serial adapter, or a Rigblaster or SignalLink type interface, and directly control the CW keying of your transmitter, and transmit in CW mode. It's that easy!
Decoding ACARS Transmissions With MultiMode
One of the more interesting digital modes that can be monitored are ACARS transmissions from commercial aircraft. Many of the routine messages that were formerly sent by voice are now sent by an ACARS digital link between the radio and ground. This messages can be received on any scanner type radio that tunes the VHF Aircraft band (118-136 MHz) using MultiMode.First, you'll want to know what you should be hearing. Click here to listen to a typical ACARS packet You'll find that weekdays are the busiest times to listen, often you can hear a packet sent every few seconds. Due to the height of aircraft (30,000 feet or more), their ACARS transmissions can be heard for great distances, up to a few hundred miles.
You'll need a radio that tunes the above-mentioned band, in AM mode. Most scanners will do this fine. Make sure you disable the squelch mode in the radio, so you always hear static. Now, tune your radio to one of the ACARS frequencies. There are several to choose from:
129.125 MHz	USA and Canada Additional
130.025 MHz	USA and Canada Secondary
130.425 MHz	USA Additional
130.450 MHz	USA and Canada Additional
131.125 MHz	USA Additional
131.450 MHz	Japan Primary
131.450 MHz	NZ ARINC Channel
131.475 MHz	Air Canada Company Channel
131.525 MHz	European Secondary
131.550 MHz	World Primary
131.725 MHz	Europe Primary
131.850 MHz	New European Channel
136.700 MHz	USA Additional
136.750 MHz	USA Additional
136.750 MHz	New European Channel
136.800 MHz	USA Additional
136.850 MHz	SITA North America
136.900 MHz	European Secondary
There aren't a lot of settings to worry about with ACARS mode, so it is pretty easy to decode without a lot of fuss. There's a checkbox to suppress parity errors in received messages, and another toggles between two text formats for displaying messages. That's it! Select ACARS mode from the Mode menu in MultiMode, to start decoding.
Many of the messages are routine, such as:
.N643DL  Q0 0   [26 Jan 2004   16:28:05][DAL Boeing 757 23997]
S77A DL2581
N643DL is the tail number of the plane. Q0 0 is the message type. The date and time are automatically stamped by MultiMode. The aircraft database file that comes with MultiMode has identified the tail number, and displayed information about the airplane, which type it is. Finally the message itself is displayed on the next line.
Some of the messages are less routine, and more interesting. I won't divulge any here, but they include unruly passengers, and equipment failures onboard the aircraft, usually involving the lavatory.
MultiMode - Decodes weather fax and satellite images on your Macintosh, without the need for extra hardware.
Return to Black Cat Systems
info@blackcatsystems.com Chris Smolinski, N3JLY
